Wednesday 20 January 2010

Props, Costumes and Equipment List

Props:
• Garage tools such as spanners, a hammer, wrench, Blow torch which the killer will use inside his garage
• Fake blood using experimented ingredients
• Bin bags for the dead bodies
• Yearbook which will show the victims
• Fake Blood for the crossing out of dead pupils in the yearbook
• White van which the killer will use
• Microphones for the news reporters
• Television which will be used at the end for the killer's over the shoulder shot

The main prop used in the opening to our film was the yearbook, as it was the whole storyline is based around. As a group we made the year book, using pictures inside of students in our media class, and also the actors in the film we did this to make the year book look as realistic as possible. We designed the yearbook so that it looked old and worn as it belonged to a student that went to the school ten years previously. It was my idea to bring the yearbook into the film as it gave the audience a sense of understanding about what was happing in the opening of our film, and I think that it worked really well. Another key prop in the production of our film was the fake blood, which was obviously used to show the death and pain of the antagonist's victims, we developed a video on the making of the fake blood. A large white van was used in our film, which was the killers mode of transport and also where he would store the bodies after he had killed them.

Costumes:
• Overalls for the killer
• White T-shirt and jeans for Fuchsia
• First dead body will be dressed in casual jeans and any coloured t-shirt
• The news reporters will be dressed in smart suits, for the male this will consist of blazer and tie, and for the woman skirt and blouse
There is more information about the costumes that will be used in the film opening, which can be found on the characater profile and costumes section on my blog.

Equipment:
• Three cameras
• Three tripods
• One dolly
• Three memory cards
All the equipment listed above is essential for the making of our film, as there will be three cameras shooting the action at all times to provide with another suitable shots to be able to cross-cut and fade to different angles of the action. Therefore we need the three memory cards and the three tripods. We only need the one dolly as this is only for one part of the opening and only one camera is needed to film it.

As a group we discussed what props, costumes and equipment would be needed in our film in order to make it the best it can be. I feel that all the things listed above will help us to create a great opening to a horror film. This is just a list of everything that we are using there is more detailed descriptions of what we are using and why found on my blog.
Production of the Fake Blood

The above video is showing the production of the fake blood that we used in our film. We produced this video to show what ingredients we used to make the blood and also how we actually made it. I starred in the film, and Stephanie filmed it, I also put the video together using the adobe software. Producing the fake blood film helped me become more comfortable with the editing programme and allowed me to get further practice of using it.

Fake Blood

Ingredients
Syrup
Peanut Butter
Water
Flour
Red Food Colouring
Chocolate Spread
Chocolate Powder


We tested several sets of ingredients in order to find which one produced the best blood alternative, and we came to the conclusion that the ingredients listed above worked the best. We have filmed the making of our fake blood to show exactly what we did and how we did it. We feel that the fake blood looks really good, and is around the same consistency of blood so this makes it look more real. We have decided to use fake blood as a prop in our short film as it makes it scarier and makes it more believable to the audience. Therefore we think that the fake blood we are using in our film, is one of the most important props as it adds a great deal to the piece.

Me and Stephanie made the fake blood, we aslo filmed how we made it to show exactly what we did. I also edited the videos together using adobe premier elments, to make it look the best it could and to provide me with yet more practice at using the programme. I think that the video has come out really well as it shows exactly what we did and how we did it, the ingredients are shown above so using them and the video I produced anyone could make the fake blood. The video is shown in the post above.


Shot List

Filming Schedule2

This is my groups shot list, the shot list was designed by my fellow group member James. My own personal input into the shot list, was putting my ideas forward of what type of shots to use to have the best effect on the film. We have included a range of different camera angles in our shot list as we think they are needed in our piece to make it the best it could be. The shot list has been made very detailed in oder to make it easier for us when we was filming, it also came in as a great help for know what type of camera angle to use for each shot.

Location Scouting


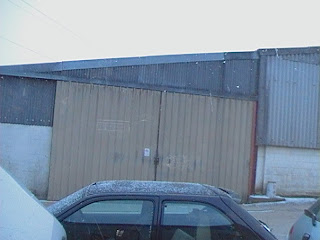
My personal input into the location scouting was helping to find the appropriate locations for all the parts of the opening of the film, for example we are using my dads workshop to film most of the opening as the location fits the storyline of the film really well, it also provides the antagonist a place to plan his murders and store the bodies. The fact that it is in a garage also provides the killer with a proffesion which makes him even more unassuming. I also took all the pictures for the location scouting. Tom and James also had a large input into the location scouting information as they wrote the vast majority, putting everyones ideas together in the format below.

Our group came up with ideas on where we would like to film our horror movie to make it as effective as possible. We decided that we will film in multiple locations, so that we make the audience think about where these locations are and if the killings involved are linked. We decided to have our antagonist’s workplace as a car bodyworks garage which is located in Great Leighs. We have chosen this because it can be a quiet place where no-one knows the goings on inside. There is a large supply of murder weapons and tools of his trade. We could film this at any time during the day, as it will not matter whether our light source is natural or not. However filming at night will personify our antagonist’s personality, as he is a dark character who is aiming to kill. We also think that the garage is a good location to choose because it is a dark and scary place which is synonymous with the horror genre.

We will also film outside a pub because our antagonist meets one of his victims and we film them both leaving the pub and getting into his van. The pub we will be filming at will be located in Broomfield .This shows the innocence of the victim as she doesn’t know what is going to happen to her. This also makes our antagonist more vulnerable because he is seen in public, but at this time in the film no-one suspects him to be the killer. We will film outside the pub at dusk, so we have some natural light, but also it shows the end of a meeting in any normal circumstances, which is making our short film all the more realistic. This location is an important part of the film because it shows our antagonist in public and also makes the audience question what is going to happen to the woman that he leaves the pub with.

We will be filming our news report outside the front of Chelmer valley high school. This will be because in our film all the murders are linked, they are only linked because the people that have died all where in the leaving class of 1995. This shows that all the victims come from here as the background of the school symbolises it. We will be filming this during the day as will we try to make the report as realistic as possible. So we will probably film the news report during one of our media lessons. The news report will be the ending of our opening of the film; we have chosen to do this because it leaves the audience with a sense of suspense about what is going to happen next, if we were to make the entire film.

We will also be filming in a woodland area which will be in St. Andrews park which is located in Newland Spring. We have decided to choose this location as a scene for or first murder. The Kingsford production team has decided that the woods is a good place for the victims body to be because it is dark, scary and it gives the audience a sense of fear, because the image of the corpse will be hard hitting. We will film the killer’s feet walking away from the victim through dead leaves, which connotes more death and destruction, showing that the antagonist is killing everything in its path. This will also be filmed at dusk to show the transfer from light to dark, just like the killers personality.

Animatic Storyboard

This is my animatic storyboard, it involes drawn out pictures of the scenes in the opening of the film and then as a group we have narrated the storyboard. I drew all the pictures for the story board and also narrated and filmed section of it, My other input to the storyboard was to edit it and produce it on premier adobe elements, I enjoyed editing the piece as it provided me with more practice with using the editing programme. Therfore by the time I use it to edit my final piece I know exactly what im doing.

Photo Storyboard

This is My Photo Storyboard

This photo story board, is what me and my group (KingsFord productions) produced in order to show the basic set out of the opening to our film. My input into the the storyboard was i went out and took the pictures for the storyboard, although some of the pictures are not the exact loaction we are going to use whilst filming, the storyboard is a good idea of what the film will be like. I also wrote some of the notes about each picture in the storyboard, to make it clear to the viewer what the picture is depicting.